If you’re having trouble fixing “Cannot turn Windows Defender in Windows 10”, this post is for you.

We’ll walk you through the most common fixes for this problem and provide step-by-step instructions so that you can resolve it quickly.
We’ve covered you if you need help with installation, startup, or performance!
Steps to Fix On Can’t Turn Windows Defender In Windows 10
Step 1- Turn On Real-Time Protection
Your device’s Windows Defender real-time protection has likely been disabled.
It may cause the program to seem to be closed. It also inhibits a significant portion of Defender’s functionality, which is not advised.
The steps are as follows:
- To access the Start menu, click on the Windows icon in the bottom left corner of your screen. Use the Windows + I shortcut or choose Settings from the list.

2. Tap on the Update & Security tile. Most of your security settings are located here.
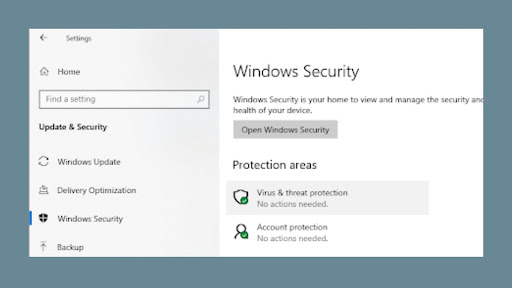
3. Select Virus & threat protection from the Windows Security menu, then choose it. 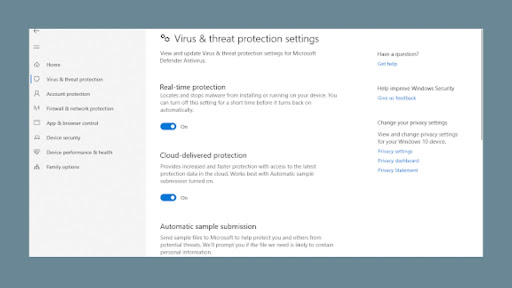
4. Under the Virus and threat protection settings header, you’ll first need to click on the “Manage settings” link. You’ll be taken to a new webpage after this. To enable Windows Defender, click the Real-time protection button.
Step 2- Temporarily Disable Your Third-Party Antivirus
Antivirus software, in particular, has a reputation for interfering with apps and services and causing failures. By temporarily disabling the current antivirus program, you may verify if it is causing the problem.
Note: Because it is dangerous to operate your computer unprotected, this approach is not recommended.
Only proceed if you know about the possible hazards and have a backup system in place to repair any harm that might be done.
- Select Task Manager from the context menu of the space in your taskbar. Make sure to extend details by clicking on the “Mode details” switch if the Task Manager launches in compact mode.
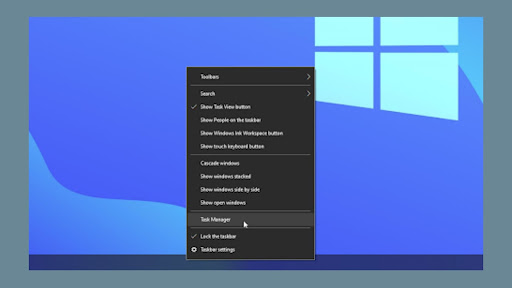
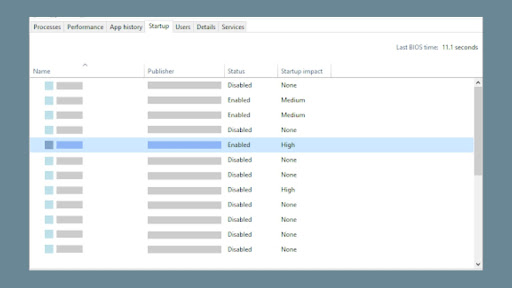
- By clicking on the header menu at the top of the window, you may switch to the Startup tab. By clicking on it once, you can locate your antivirus software from the list.
- You’ll now find the Disable button in the window’s bottom-right corner. When you start your device, this will prevent the application from launching. Now reboot your computer.
Step 3- Restore Corrupted System Files
Corrupted system files may severely harm your operating system. File corruption is one of the leading reasons Windows Defender does not start. However, you may identify and fix corrupted system files using the SFC scan.
In Windows 10, a built-in application called System File Checker (SFC) may assist with troubleshooting.
It may identify and repair damaged system files on its own. To handle several problems, use the SFC scan.
1. You may open the search bar by clicking on the magnifying glass icon in your taskbar. With the Windows + S keyboard shortcut, you can also bring it up.
2. In the search box, type: Command Prompt Right-click on it and select “Run as Administrator” when you see it in the results. 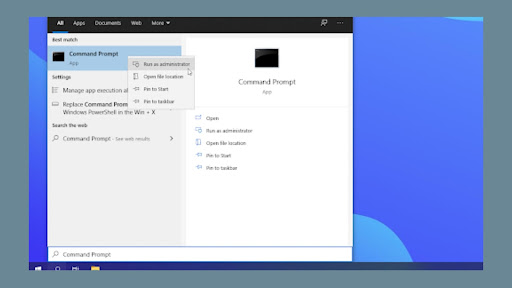 3. Allow the app to run with administrative privileges when required by User Account Control (UAC).
4. To run the following Command, type it in and press Enter: sfc /scannow 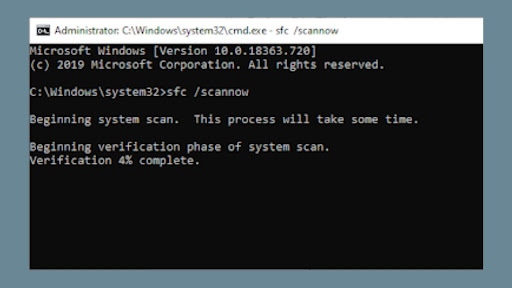
5. Wait until the System File Checker has finished scanning your computer. The utility will restore the needed system files and try to fix all associated faults if any discrepancies are found.
The SFC scan may take time to examine your system and locate any missing or damaged system files.
Some users say that running the scan improved their PC’s performance even if it did not detect anything.
Step 4- Use the DISM Command To Repair System Images
By simply running commands in the Command Prompt application, the DISM tool can identify and fix corruption problems with your system.
It automatically tries to recover deleted or missing data and checks for corruption systemwide.
- Using the elevated Command Prompt, Method 3 is available for you to check. For instructions, see “Restore Corrupted System Files.”
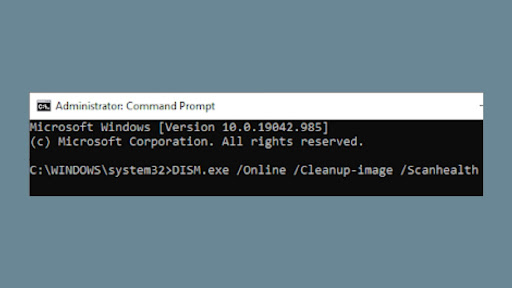
- The DISM scan must be started after you’ve entered the Command Prompt and will look for problems systemwide. To run the Command, type DISM.exe /Online /Cleanup-image /Scanhealth and press Enter.
- After that, you must issue a command to address any problems on your computer. For example, DISM.exe /Online /Cleanup-image /Restorehealth is a line you can copy and paste into the Command Prompt window.
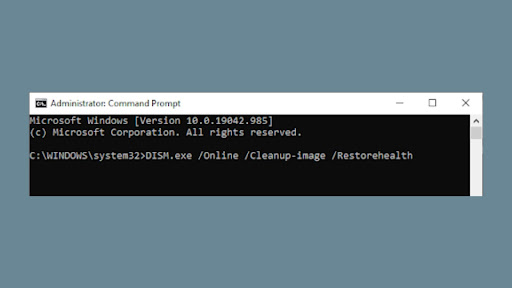
Wait until the process is completed. Then, close the Command Prompt window after you finish, and your device will restart.
You can also use Windows Defender now.
Step 5- Restart the Security Center Service
You must enable certain services for Windows Defender to operate. For example, defenders may not launch if certain services have been blocked.
Start these programs and make sure they are functioning correctly in the future using the procedures listed below.
- On your keyboard, press the Windows + R keys. The Run utility will be launched as a result of this.
- Type “services.msc” on your keyboard without quotation marks and hit Enter. The Services application will be launched as a result of this.

- Locate the Security Center service & right-click on it. Select Refresh from the context menu. It will ensure that the service is turned on correctly.
Check the Windows Defender launch after you have finished the required service.
Benefits of Windows Defender in Windows 10
Windows Defender is a powerful antivirus program that comes pre-installed on Windows 10.
It’s been designed to protect your computer from viruses and other malware, and it’s been improved over the years to become even more effective.
Some of the benefits of using Windows Defender include the following:
– It’s easy to use and navigate.
– It’s fast and efficient, so it will keep your computer and take up only a little space.
– It offers real-time protection against viruses, spyware, and other malware.
– It provides a Historian feature that records all the changes made to your computer since it was first set up. It means you can see exactly how dangerous any malicious files were and whether they posed any risk to your computer or data.
– It offers a report feature that displays detailed information about any detected viruses, spyware, or malicious software. It supports task scheduler integration, so you can quickly run it once a day or weekly to keep your computer protected.
Windows 10 updates and how to keep your computer safe?
Windows 10 is a significant update to the Windows operating system released in July 2015.
It has been met with lots of fanfare and rave reviews, with many praising its sleek new look and intuitive user interface.
Like all updates to Windows, Windows 10 comes with risks and potential problems.
If you’re not careful, your computer could get infected with malware or viruses or even suffer a hardware failure.
For your computer to stay safe during the Windows 10 update process (and any subsequent updates), follow these simple tips:
– Back up your important files regularly (especially if you’re using a cloud storage service like iCloud).
– Install antivirus software on your computer.
– Keep your computer updated and ensure you have installed the latest security patches.
– Use caution when downloading files from unknown sources and, of course, never download anything from the internet you don’t trust.
Best ways to optimise your computer for faster performance
Windows 10 is a significant update to the Windows operating system, and it’s packed full of features that make your computer run faster.
Here are some of the best ways to optimise your computer for faster performance:
- Check for updates: One of the most important things you can do to optimise your computer for faster performance is to check for updates and install any available. The latest Windows 10 contains all the latest security patches and bug fixes, making your computer more stable and efficient.
- Remove bloatware: Bloatware is the software you don’t need but is included in your computer anyway because a company wants you to buy its product.
It can slow down your computer and take up valuable space on your hard drive, which could be used more efficiently by applications you use.
To reduce the amount of bloatware on your computer, try using an antivirus program like Malwarebytes or Windows Defender or going through the software installation wizard instead of letting the program install everything automatically.
- Clean up your PC: One of the worst things you can do to improve performance on your computer is to keep it dirty and cluttered.
Every time you start up your computer, it has to scan through all the files on your hard drive, looking for viruses or other threats.
If there are any problems with those files, it can slow down your computer significantly.
Use a desktop cleaner like CCleaner or Windows 10’s built-in system cleanup tool to clean up your hard drive and improve performance.
- Optimize your computer settings: Another way to optimise your computer for faster performance is to adjust its settings.
You can speed up Your browser using the following steps:
– Open the Start menu and search “Microsoft Edge.”
– Click on the Microsoft Edge icon in the results list, then click on “Settings” (located in the left column).
– Under “General,” make sure that “Advanced settings” is selected and click on the “Optimize performance” button.
– Under “Settings for specific websites,” make sure that the website you want to speed up is checked and then click on the “<Add >” button next to it.
– Enter the desired parameters (like Metabase size or several threads) into the corresponding fields, then click on the OK button.
Conclusion
In conclusion, we hope everything becomes sorted out after performing all these procedures as they are simple.
Keep an eye on the changes for a while, but eventually, everything should get back to normal smoothly!
If anything goes wrong when doing so, remember to use antivirus software to detect potential malicious threats before acting upon them too quickly!
